Problem
When building new web application prototypes there is value in rapid redesign on both clients and servers. Can we make it easy for client programmers to tinker with server prototypes?
Context
While in many situations it is possible to create a mock server API for clients to consume, in some cases there is value in more realistic data sources. Examples include real-time collaboration and Internet-of-Things (IoT) scenarios.
The situation can arise in small agile teams whose focus is primarily on web client applications, but who depend on evolving or establishing server-based resources and APIs. This may be early in proof-of-concept phases, after paper prototyping and perhaps in place of Wizard-of-Oz 🔗 testing, and hopefully long before a production implementation.
Another context may simply involve the rapid provision of a more realistic sandbox API server that can stand in for or provide controlled access to expensive or sensitive resources.
Solution
One solution that is experiencing a re-emergence of popularity and interest driven by the IoT community is data flow programming as exemplified by Node-RED 🔗 , a visual editor from IBM Emerging Technologies. Node-RED and similar projects offers a number of advantages in API design over mock-based strategies or rapidly coding an API prototype from scratch, not the least of which is an interactive visual formalism of programmatic data flows.
Forces
- Co-evolving server and client architecture or API
- Need for user validation of designs that goes beyond Wizard-of-Oz approaches
- Value in a self-describing architecture with a visual representation
- Need for rapid and moderately high-fidelity emulation of an actual resource
Example (Part I) - RESTful API for MIDI Controller
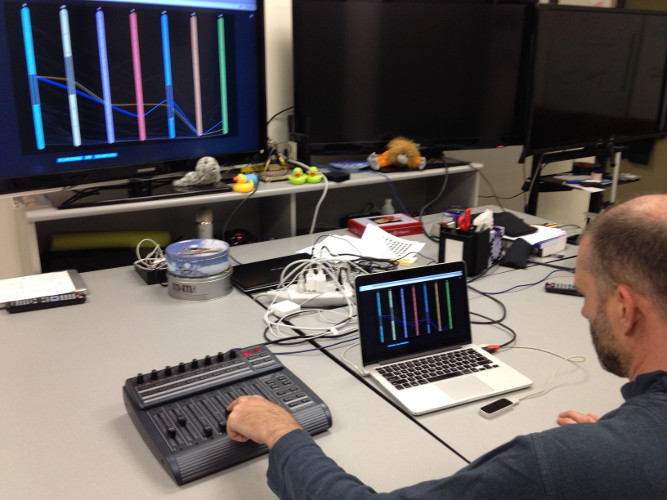
For our upcoming example, we will design a RESTful API for a motorized Behringer USB/MIDI Controller 🔗 . Note that REST stands for Representational State Transfer, a design strategy that employs the HTTP protocol for server APIs based on resource names and a small set of simple operations, e.g. GET, PUT, POST, DELETE. We’ll use the GET command to allow local and remote users to read the control positions, and we will use the PUT command to let local users update the MIDI values (remote users attempting to PUT will see “Permission Denied”). Ultimately we will use our API to control a parallel coordinates visualization.
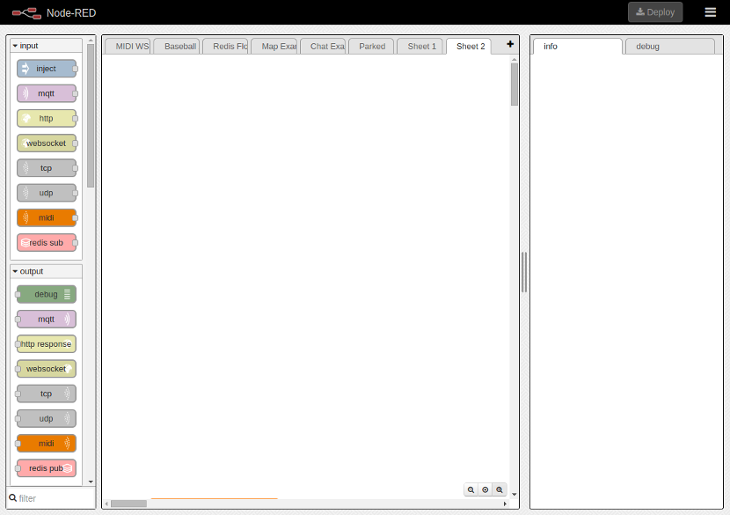
In my next post I will get into teaching Node-RED how to offer MIDI signals, but for the moment I will briefly explain how Node-RED works in general. The first time you open the flow editor you will see a blank workspace similar to the image below. In simple terms you write programs by dragging nodes onto the workspace, configuring them as necessary, connecting them together, and then hitting “Deploy”.
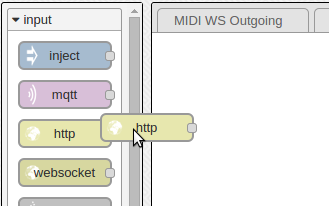
We start by dragging an HTTP input node onto the canvas.
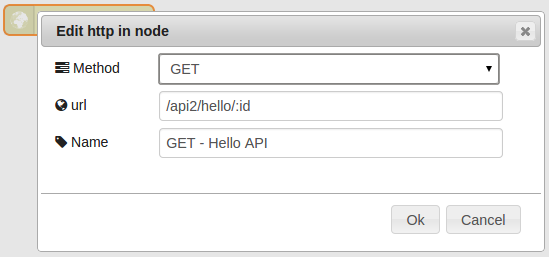
Then we double-click on it to configure it. I defined the URL with a placeholder for “id”, and used the namespace “api2” to distinguish this walkthrough from an existing API on my system. Clearly you can name it whatever suits your needs.
Next we drag a function onto the canvas.
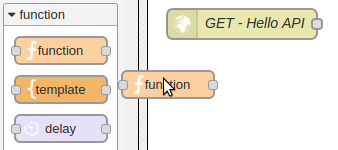
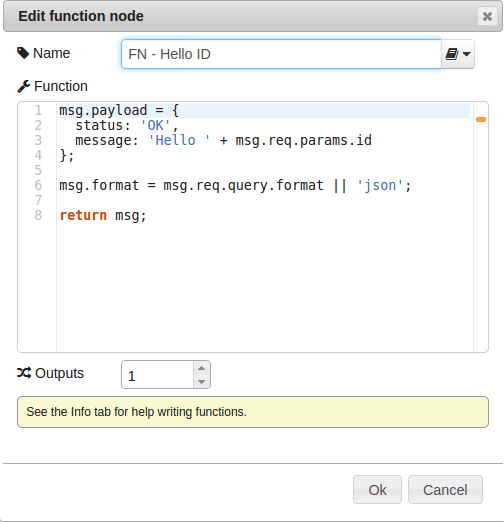
… and then we add a little JavaScript code. There are a few things to notice here. First, you might notice we can use the “msg” object immediately. This object is what is passed around your workflow, and you produce changes in your system by modifying its properties for downstream nodes. Most of the time you will be modifying msg.payload, as we do in this example, but notice you also have the ability to define new properties (msg.format in our example) that will be retained throughout the flow.
At this point in the workflow we are receiving input from an HTTP node, and so we can expect “msg” to contain a “req” object from Node-RED’s embedded Express engine (you can get more details by clicking on the HTTP node and looking at the Info tab in your flow editor). We are going to be using req.params and req.query to express our API variables. Our id variable will come from req.params.id, and our format variable will come from req.query.format. Note that this is merely illustrative, and not necessarily a best practice.
We want to use the variable “msg.format” for a downstream Switch node, so we define it as a new property. We make sure to “return msg” so that our changes are passed along to the node’s output.
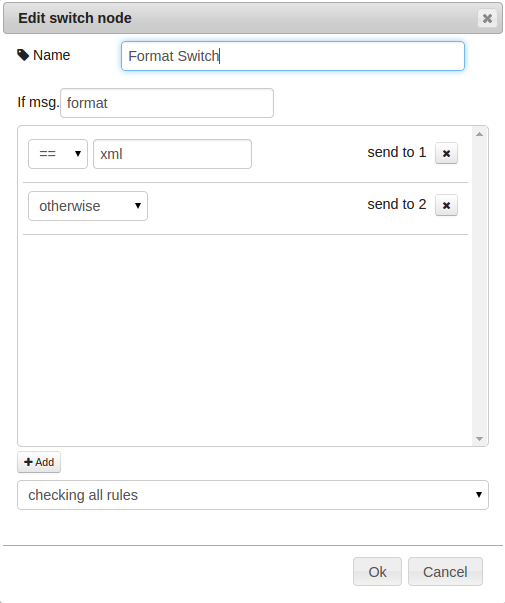
We have decided to support both XML and JSON in our API. We could have used our input function to define two outputs, but there’s an easier way. Node-RED comes with nodes that simply apply transformations to what they find in msg.payload. To create two streams, we will branch with a Switch node by dragging one onto the canvas and configuring it as shown. You can define as many outputs as you want. In our case we need two: one for XML and the other (the default case) for JSON.
Finally we connect the outputs of the switch to the inputs of the XML and JSON output nodes (no configuration required), and then their output is in turn fed into an HTTP output node. The final workflow looks like this.
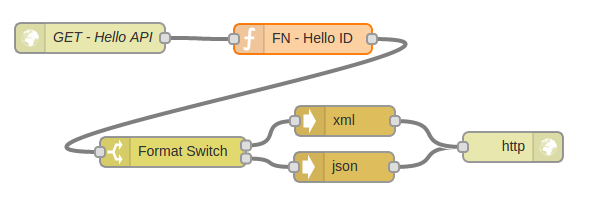
We can now query our API from the console. First I will specify id = “readers”, and format = “xml”:
curl http://localhost:1880/api2/hello/readers?format=xml<?xml version="1.0" encoding="UTF-8" standalone="yes"?>
<root>
<status>OK</status>
<message>Hello readers</message>
</root>Recall that we had defined a JavaScript object in msg.payload, with properties status and message, and now these are serialized as an XML string.
To test the other format, this time I will specify format = “json” at the command line:
curl http://localhost:1880/api2/hello/readers?format=json{
"status": "OK",
"message": "Hello readers"
}The output is a JSON serialization, as requested.
Node-RED has already saved this into your personal workspace, and it will be there the next time you start the server. If you want to share this workflow with others you can easily serialize it by using their export function. This is what that looks like, a little “prettified” for this blog post. Try copying and pasting it using the “Import from … Clipboard” feature of Node-RED (found under the “double hamburger” icon, upper-right), but please note that you will need to make it a little less pretty by removing the carriage return in the function definition in the second node. Apparently we paid a price for prettification.
[{
  "id":"d644025b.29bc", "type":"http in", "name":"GET - Hello API",
  "url":"/api2/hello/:id",
  "method":"get", "x":116, "y":85,
  "z":"1cb89973.e34767", "wires":[["b11e7de3.4ee18"]]
},
{
  "id":"b11e7de3.4ee18","type":"function","name":"FN - Hello ID",
  "func": "msg.payload = {\n  status: 'OK',\n  message: 'Hello ' + msg.req.params.id\n};
  \n\nmsg.format = msg.req.query.format || 'json';\n\nreturn msg;",
  "outputs":1, "x":329, "y":86,
  "z":"1cb89973.e34767","wires":[["eeaeef8a.11511"]]
},
{
  "id":"89d6536f.7629b", "type":"http response", "name":"",
  "x":539,"y":194,"z":"1cb89973.e34767","wires":[]
},
{
  "id":"eeaeef8a.11511", "type":"switch", "name":"Format Switch",
  "property":"format",
  "rules":[{"t":"eq","v":"xml"},{"t":"else"}],
  "checkall":"true", "outputs":2,"x":199,"y":199,
  "z":"1cb89973.e34767",
  "wires":[["56dc2ada.a923d4"],["48af0eaa.b750f"]]
},
{
  "id":"48af0eaa.b750f", "type":"json", "name":"",
  "x":370,"y":214,"z":"1cb89973.e34767",
  "wires":[["89d6536f.7629b"]]
},
{
  "id":"56dc2ada.a923d4","type":"xml","name":"",
  "x":371,"y":168,"z":"1cb89973.e34767",
  "wires":[["89d6536f.7629b"]]
}]
If you have gone ahead and downloaded Node-RED for yourself you’ll notice that my blank workspace has some input nodes that don’t ship with the default installation (all the ones so far definitely are there). If you were to copy and paste a workflow containing undefined node types, Node-RED would let you save and deploy your workspace but then it would produce console errors indicating which node types were missing.
New node definitions can be added by following the instructions here 🔗 . We will eventually be doing that after we write our first prototype MIDI API. For a quick preview of interacting with MIDI in NodeJS, we will try to get our MIDI signals via the NodeJS RtMIDI wrapper project node-midi 🔗 . The following NodeJS console script gives us a good starting point:
var midi = require('midi'), input = new midi.input();
input.openPort(1); // ID determined from testing

input.on('message', function(deltaTime, message) {
  console.log('message : ' + message);
});
When moving a slider on the panel, we see a sequence of messages like this:
message: 176,81,3
message: 176,81,2
message: 176,81,1
message: 176,81,0
In the next post we’ll see how to incorporate our script into a RESTful API.